Laptop and Computer service
Laptop service
The laptop will be affected by many problems. Here, we are going to see that how to identify the problem and the solution. The most common problems are software issues, waterlog issues, dead issues, black screen, auto restart, hanging issue, not charging properly, unwanted sound from a hard disc while running.
Software Troubleshooting
Best Operating Systems In the Market
- MS windows
- Chrome OS
- Mac OS
- Fedora
- Free BSD
- Ubuntu
- Solaris
MS-Windows :

In 1983 Microsoft developed windows. Windows is a world-widely used OS.
List of windows OS
- Windows 1.0,
- Windows 2.0,
- Windows 2.1x
- Windows 3. x
- Windows 3.0
- Windows 3.1x
- Windows NT
- Windows NT 3.1
- Windows NT3.5
- Windows NT3.51
- Windows NT4.0
- Windows NT2000
- Windows XP
- Windows Vista
- Windows 7
- Windows 8
- Windows 8.1
- Windows 10
Microsoft Windows (also referred to as Windows or Win) is a graphical operating system developed and published by Microsoft. It provides a way to store files, run the software, play games, watch videos, and connect to the Internet. Some examples include versions of Microsoft Windows (like Windows 10, Windows 8, Windows 7, Windows Vista, and Windows XP), Apple’s macOS (formerly OS X), Chrome OS, BlackBerry Tablet OS, and flavors of Linux, an open-source operating system. Some of the features it is known for are i) Windows Live, ii) Windows Search, iii) Windows Updates and iv) Windows Taskbar.
Also Read: Mobile Software Training
Also Read: CCTV Installation Service
Windows Live :
Windows Live is a group of tools and software for use with Windows. All Windows users can have access to use Windows Live by creating a free account. Windows Live consists of a chat client, networking tools, a movie maker, a photo gallery, email, and Internet functions. Based on their needs user can choose the download content and use them.
Also Read: Laptop Chip Level Service
Windows Search :
Windows Search is a search function that is provided with Windows, it allows the user to search throughout the computer. Windows Search option is provided in the start menu. Users can search for files based on name, date, and file. Even if you don’t Remember the document name also It allows the user to search for text inside a file.
Also Read: eMMC Repair Training Institute
Windows Updates :
It Provides an automatic update feature, that keeps the operating system to be safe and up-to-date. Security updates are also provided with this feature that protects from new risks, fixing bugs, and software updates. Based on users’ requirements the automatic update features can be turned on or turned off. Windows gives maximum security for automatic updates.
Windows Taskbar :
The taskbar in Windows is provided at the bottom of the screen by default, it allows the user to move the taskbar to the top, left side, or right side of the screen. The taskbar act as a navigation tool for Windows. It is consisting of the Start Menu, which allows the users to access programs and features. By default, it has a clock, calendar, and program icons. The icons in the taskbar are customizable.
Process for Installing MS Windows :
Check hardware compatibility
- Before installation or up-gradation of Windows on your computer, the user needs to check for the hardware in the computer that is compatible with the windows version.
- Microsoft provides a list of Products for checking, whether the hardware in the computer is compatible with the selected version of Windows.
- If the hardware in your computer is not compatible with the selected Windows version, then it is recommended to replace the hardware required version of Windows.
Genuine Windows CD, DVD, or USB Pen drive :
- For installing Microsoft Windows, a genuine copy of the OS is required in a CD, DVD, or USB Pen drive.
- A product key is also given with the installation disc, which is used to activate the Windows during the installation.
Installing or upgrading Windows :
To start the Windows installation or up-gradation process, your computer needs to be configured to boot from a CD or DVD before booting to the hard drive. The change of Booting process allows the computer to check for the Windows installation disc before it tries to boot from the hard drive.
First Open the CMOS setup.
To order to enter the BIOS setup, the following five keys shown below are used.
- F1
- F2 – opens a diagnostics tool.
- F10 – used for the boot menu.
- Del
- Esc
- To Change the computer’s boot order. the CD, DVD or disc drive has to be set first to boot the device if you are trying to boot from a disc. Or, set the first boot device to your USB drive if you’re trying to boot from a USB Pen drive. If the drive is not shown, keep the disc is inserted and then reboot the computer. With the disc in the drive, BIOS can recognize and add it to the list.
- Save the settings change and exit BIOS.
- Once you have chosen the boot order, you can begin the Windows installation process.
- Place the Windows disc in the CD/DVD drive or USB Pen drive into the computer.
- Then Turn on or restart the computer. As the computer starts up, it has to detect the installation disc or drive and show a message as Press any key to boot from CD. After Pressing any key on the keyboard, then the computer start booting from the Windows disc or drive.
- Once the Windows install begins, there are several prompts that you need to select. It may be either Yes or the appropriate option to install Windows.
- Make sure you select the Full Install option and not the Repair or Upgrade option.
- If you are upgrading to a newer version of Windows, select the Upgrade option instead of the Full Install option.
- It Prompts which partition to install Windows, then chooses the main partition, by default the partition will be C: drive or one labeled “Unallocated partition”. While upgrading Windows, select the existing installation of Windows on the hard drive.
- It will show you the erase all contents on the hard drive, once the erasing of content is completed, then install Windows.
- The computer may need to restart several times during the Windows install process. The restarts are normal and if prompted to restart, select the Yes option.
- When the installation process is nearly complete, the Windows configuration option screens are shown. On these screens, you can change the time zone, preferred language, and the name of the account to access Windows.
- The Windows install process is completed when the computer prompts you to log in or when it loads into Windows.
Chrome OS :
Google Chrome OS is an open-source lightweight operating system (OS). It uses one-sixtieth as much hard drive space as Windows 7 and is intended for netbooks or tablet PCs that access Web-based applications and stored data from remote servers.
features :
Five Features of Chrome OS are
- A native tab manager
- A built-in clipboard manager
- A new quick-access center for files
- Support for Nearby Sharing
- Enhanced media controls
Process for Installing Solaris :
Requirement :
- UEFI support in the motherboard
- Support for legacy BIOS has also been added, but there are a few limitations.
- Intel-based CPU and GPU
- Support for AMD CPU and GPU has also been added, but currently, it only supports AMD Ryzen 3XXX and AMD Stoney Ridge processors
- A USB Pen drive with at least 16GB of storage space.
Downloads
- First, download the Linux Mint Cinnamon. You can also use other Linux distros such as Ubuntu or Debian, but since Linux Mint is pretty lightweight,
- Next, download Rufus (Free) so that we can flash Linux Mint Cinnamon on the USB drive.
- After that, download the official Chrome OS recovery file. from here. If this link is not working then you can download the image from here as well. Open the website and search for “rammus”. Now, click on the latest recovery image to download it.
- follow the below rule and download the specific image based on your processor.
- “rammus” is the recommended image for devices with 4th generation Intel CPU and newer.
- “Samus” is the recommended image for devices with 3rd generation Intel CPU and older.
- “zork” is the image to use for AMD Ryzen 3XXX.
- “grunt” is the image to use for AMD Stoney Ridge.
- Now, download the most important file: Brunch. The framework creates a generic Chrome OS image from the official recovery image so it can be installed on any Windows PC.
- Finally, download the “install. sh” script which installs Chrome OS without manually typing the commands.
- Connect your USB Pen drive and open Rufus. Next, click on the “Select” button and choose the Linux Mint Cinnamon image. Now, just click on “Start”. You will get a few prompts so click on “Yes” and “OK” to continue the flashing process.
After Rufus is done with flashing, close it. Now, create a folder named “Chrome OS” on your desktop. Move the “install. sh” file to the “Chrome OS” folder. - Next, right-click on the Brunch file and choose “Extract to Brunch…”. All the files will be extracted in a folder on the desktop.
- Now, move all the extracted Brunch files to the same “Chrome OS” folder on the desktop.
- Similarly, extract the official Chrome OS recovery file and you will get a folder on the desktop. Open it and rename the file to rammus_recovery.bin. Finally, move the “rammus_recovery.bin” file to the “Chrome OS” folder. In the end, you should have these 6 files inside the “Chrome OS” folder.
- Now, move the whole “Chrome OS” folder to the USB drive on which you just flashed Linux Mint Cinnamon.
- Plug the USB flash drive into the PC on which you want to install Chrome OS. If you are installing Chrome OS on the same PC then keep it plugged in.
- Next, restart your PC and press the boot key continuously to boot into the UEFI/BIOS menu.
- Once you have entered the BIOS, move to the “Boot” tab and select “UEFI” from the Boot List Option. If this option is not available then don’t worry, move to the next step. After that, move to the “Security” tab and disable “Secure Boot”. Finally, move to the “Exit” tab and choose “Exit Save Changes“.
- You will boot straight into Linux Mint Cinnamon. If you are prompted with a splash screen, choose the default option: “Start Linux Mint“.
- Now that you have booted into Linux Mint, click on the network icon at the bottom-right corner and connect to WiFi or Ethernet.
Mac OS :
Mac OS is a proprietary graphical operating system developed and marketed by Apple Inc. since 2001. This operating system is only for Apple’s Mac computers. macOS makes it possible to complete all kinds of everyday tasks on your computer. For example, you can use it to browse the Internet, check your email, edit photos, listen to music, and play games.
Features :
- Continuity Camera.
- Dark Mode.
- Desktop Stacks.
- Dynamic Desktops.
- Finder enhancements: Gallery View, view metadata, and Quick Actions.
- Improved OS and Safari security.
- Screenshot markup.
Process for Installing Mac OS :
Overview :
macOS is the operating system that powers every Mac. It lets you do things you simply can’t do with other computers.
Requirements :
Before starting the installation the following need to be checked:
- A 15GB or larger removable USB Pen drive to hold the installation file.
- Need to take backup, in case something goes wrong.
Format the external drive
Do the Following to format the USB drive correctly:
- Plugin the USB drive.
- Go to Applications > Utilities.
- Open Disk Utility.
- Select the drive and click Erase.
- Select Mac OS Extended as the format type.
- Choose GUID Partition Map from the Scheme options.
- Click Erase.
- Disk Utility will create the partition and set up the drive.
- Click Done.
Get the macOS install file :
If you’re reinstalling the latest version of macOS or installing a new version of macOS. Then you can download the installation package via System Preferences.
- Open System Preferences.
- Choose Software Update.
- Download the install files.
Once you have found the OS on the Mac App Store follow these instructions:
- To Download OS, it will check for the previous version.
- It shows a message that macOS ‘is already installed on this computer. If you want to continue?’ Click Continue.
- Enter your Apple ID and password.
- The install files will start to download.
- Once the macOS installer file got downloaded, the installer will launch automatically.
- Press Command + Q to quit out of the installer.
- The downloaded installer file will be found in your Applications folder.
Create a bootable USB disk :
- Changing USB drive into a bootable USB disk, so that we can use it to install the downloaded OS.
- To create the bootable drive using terminal, which you can open on your Mac by pressing Command + Space bar and typing Terminal.
Connect the formatted USB drive to your Mac.
Creating a bootable installer has been easy:
- Open the Terminal application on your Mac (find it by searching using Command + Space and typing Terminal)
- Now copy and paste the following text into Terminal.
- Press Return and Enter your password, then press Return again.
- The terminal will show you to erase the drive. If you want to continue press Y and then Return. The process can take a while.
- Next Terminal will spend a few minutes copying the installer file to your drive.
- When the bootable drive is prepared you will see the word Done. It can take a while.
- The installer copy can be used in multiple Mac.
Clear your Mac :
For a fresh installation of macOS, below steps to be followed,
- Connect your boot drive.
- Startup – or restart – your Mac while holding down the Option key.
- Choose the version of macOS from the external drive, then select Disk Utility.
- Select your Mac’s startup disc Home. Click on Erase.
- After the startup disk got formatted, Go back to the main Utility menu and choose Install macOS.
- Choose your startup drive as the location to install macOS.
- Once installation is complete, you can restore apps and settings from your backup, or download them again manually.
Install macOS :
Steps to be followed to install macOS from a bootable drive:
Plugin your bootable, Turn off your Mac.
- Press and hold Option/Alt while the Mac starts up – keep pressing the key until you see a screen showing the bootable volume.
- Choose the bootable installer
Fedora :
Fedora operating system is an open-source operating system that is based on the Linux OS kernel. Fedora operating system is the second most commonly used distribution of Linux after Ubuntu.
Features :
- Better power management.
- Better End-User Software.
- Dynamic Firewall.
- Virtual Desktop Support.
- RPM 4.9.0 Package Manager.
Requirement :
Following are the minimum system requirement for Fedora OS,
- 1GHz Processor (Recommended 2 GHz Dual Core processor)
- 2 GB RAM
- 15 GB unallocated Hard Disk
- Bootable Media (USB / DVD)
- Internet Connection (Optional)
Download Fedora 30 Workstation ISO File :
- Download the Fedora 30 Workstation ISO file on your system from its Official Web Sitehttps://getfedora.org/en/workstation/download/
- Once the ISO file is downloaded, then copy it in a USB drive or DVD and make it bootable.
Boot the OS with Bootable media (USB Drive or DVD)
reboot your system, Set the boot option as USB or DVD using Bios settings so the system can boots up with bootable media
Choose to Start Fedora :
When the system boots up with bootable media then, to begin with, installation on your system’s hard disk, choose “Start Fedora“
Select Install to Hard Drive Option :
Select the “Install to Hard Drive” option to install Fedora on your system’s hard disk, you can also try Fedora on your system without installing it, for that select the “Try Fedora” Option
Choose a required language for your Fedora Installation :
In this step choose your language which will be used during Fedora Installation, Click on Continue.
Choose Installation destination and partition Scheme :
In the next window, choose the installation destination, select the disk that suits your installation, and then choose how you want to create partitions on it. If you choose the “Automatic” partition scheme, then the installer will create the necessary partition for your system automatically but if you want to create your own customize partition scheme then choose the “Custom” option,
Click on Done
change the time zone that suits your installation and then click on “Begin Installation” Fedora 30 Installation started :
- In this step, we can see Fedora 30 Installation has been started and it is in progress,
- Once the installation is completed, you will be asked to restart your system.
- Click on Quit and reboot your system.
- Don’t forget the Change boot medium from Bios settings, so your system boots up with a hard disk.
Welcome message and login Screen after reboot :
- When we first time reboot Fedora 30 system after the successful installation, we will get a welcome screen,
- Click on Next
- In the next screen you can Sync your online accounts or else you can skip,
- In the next window, you will be required to specify the local account (user name) and its password, for login into the system.
- Click on Next
- And finally, we will get the screen that confirms that we are ready to use Fedora
- volume, Click Continue.
- Select Install macOS from the utility window that appears, click Continue.
- Now follow the onscreen instructions to do your clean install.
- Click on “Start Using Fedora”.
Ubuntu :
Ubuntu is a free operating system that uses the Linux kernel, its distribution is based on Debian It is designed for computers, smartphones, and network servers. The word “ubuntu” is an African word meaning “humanity to others”.
By default, Ubuntu contains software that includes LibreOffice, Firefox, Thunderbird, Transmission, and several lightweight games.Many additional software packages are accessible from the built-in Ubuntu Software.processs for Installing Ubuntu :overvieww :
The Ubuntu desktop is easy to use, easy to install and includes everything you need to run your organization, school, home, or enterprise. It’s also open-source, secure, accessible, and free to download.
Requirements :
Before starting the installation, the following to be considered, connectt your laptop/computer to a power source.
- There must at least 25 GB of free storage space or 5 GB for a minimal installation.
- Need access to anyone (i.e) a DVD or a USB flash drive that should contain Ubuntu OS software which is going tobe installedd.
- Need to be a precautionn, we must have a data backup. In orderr to avoid criticasituationsns, that mayarisee during installation.
Boot from DVD :
It’s easy to install Ubuntu from a DVD.
- Place the Ubuntu DVD into your DVD drive.
- Then Restart your computer.
- Once the computer boots,withwelcome screen wil appear, thelecturerr language from a list on the screen.
- TheSelectt the second option, ‘Install Ubuntu’, and press return to launch the desktop installer. To test Ubuntu, select the first option, ‘Try Ubuntu withoutwithout installing.
Boot from USB Pen drive :
- Maximum all the computers are coming with USB Booting capacity. First Insert the USB Pen drive in the USB slot and switch on your computer or restart it.
- Thenwelcomee window will appear, in that select ‘Install from DVD, after that ask to choose the language, you can give anyone install full OS or you can give Ubuntu desktop.
- If any sees while bootin fromm USB, then press F12 when your computer is turned on. In most of thecomputers, .it may take place, this will allow you to choose the USB device from a system boot menu.
- F12 Key iss used to openthe syste out the menu, ther are alternate keysthat ann be used, they are Escape, F2, and F10. preparee to install Ubuntu :
- Afirstu will be asked to choose a keyboar If the installer did not find the layout, you ca select the ‘Detect Keyboard Layout’ button to run.
- After use youwill be asked What apps would you like to install to start with? The two options are ‘Normal installation’ and ‘Minimal installation’.
- There are 2 installation-type, one to enable updates while installing and another to enable third-party software.
- Both Download updatesand Install third-party software are recommended.
- During installation turn on the internet, so that there will be an update of ubuntu software.
Naturee drive spacetryy to choose which OS you are going to install, you want to keep the previous OS and install the Ubuntu OS delete yourr previously installed operating system and replace it with Ubuntu.
Start installation :
After choosing storage, click on the ‘Install Now’ button. A storage option will be given, you can choose the storage, changes can be made by simply going back.
Click Continue to confirm the changes in place and start the installation process.
Select your location :
Login details :
- Enter your name and the installer will automaticallyinstall. you can also choose to enable automatic login and home folder encryption. If your device is portable, automatic login is no affordedd. This should stop people from accessing your files if the device is lost or stolen.background installation :
The installation will run in the background, while the window teaches about Ubuntu. Time take for Installation Based on the speed of your system and network connection.
Installation complete :
Once the installation got completed, a window will appear and ask to restart the computer. TheClickk on Restart Now and remove either the DVD or USB Pen drive when prompted. If you initiated the installation while testing the desktop, you also get the option to continue testing.
Solaris :
Solari Is the computer operating system that Sun Microsystems provides for its family of Scalable Processor Architecture-based processors as well as for Intel-based processors. Solaris systems became the most widely installed servers for Web sites.
featuress :
- If you move to a larger processor, your applications should not only run but run faster.
- It is built for network computing. It is the most successful Web server system in history.
- It includes security features lik support for IPSec, Kerberos, AMI, and smart cards.
- Solaris operating system has three extensions :
- The Easy Access Server.
- The Enterprise Server.
- The Internet Service Provider (ISP) Server. processs for Installing Solaris
Requirement :
- The Booting process is done using Bootable DVD. At the GRUB screen, press the “Enter” key, or wait for the timeout period.
- Wait while the Solaris installer boots. This can take some time.
- Select the installation type. This installation is based on the default “Solaris Interactive” installation.
- Accept the detected configuration by pressing the “Enter” key, Once the configuration is accepted, the rest of the installation is done from within an “X” session.
- Select the language for the installation.
- On the “Welcome” screen, click the “Next >” button.
- On the “Network Connectivity” screen, select the “Networked” option and click the “Next >” button.
- Select the appropriate DHCP option and click the “Next >” button.
- Enter the appropriate “Host Name” for the network interface and click the “Next >” button
- enter theappropriatee “Netmask” for the network interface and click the “Next >” button.
- Decide whether “IPv6” should be enabled on the network interface and click the “Next >” button.
- Decide whether to set a “Default Router” for the network interface and click the “Next >” button. I chose to specify my router manually.
- If you choose to set a “Default Router”, enter the router “IP Address” and click the “Next >” button.
- Decide whether to set a “Kerberos” for the network interface and click the “Next >” button.
- Specify a “Name Server” to be used with the installation if required.
- Specify how the “Timezone” should be configured on the server and click the “Next >” button. I used the “Continent And Country” option.
- Select the appropriate time zone and click the “Next >” button.
- Adjust the date-time settings if necessary and click the “Next >” button.
- Enter the password for the server and click the “Next >” button.
- The “Confirm Information” screen allows you to review the information entered so far. If it is correct, click the “Confirm” button.
- Click the “Next >” button on the “Welcome” screen.
- On the “Installer Options” screen, click the “Next >” button.
- Click the “OK” button on the “Notice” dialog.
- Select the type of installation media and click the “Next >” button. In this case, I was installing from a DVD.
- Wait while the installation starts.
- Accept the license agreement and click the “Next >” button.
- Select the default installation and click the “Next >” button. Alternatively, customize your installation and disk partitions.
- At the “Ready to Install” dialog, and click the “Install Now” button.
- Wait while the installation completes. Once the installation is completed the system will reboot.
- Accept the default NFS configuration.
- Log in as the “root” user, using the password you specified during the installation.
- Select the desired desktop. I chose the “Java Desktop System” option as it uses a Gnome desktop, which is a little more pleasing to the eye than the Common Desktop Environment (CDE).
- Close the welcome screen.
- You have now completed the installation and have a functional Gnome desktop.
Free BSD :
FreeBSD is an operating system for a variety of platforms that focuses on features, speed, and stability. It supports many applications like email readers, office suites, web browsers, programming environments, graphics programs, network servers, etc. It is mostly used as server software.featuress :
- FreeBSD System Configuration.
- FreeBSD Boot Loader and Kernel Configuration.
- FreeBSD System Initialization
- FreeBSD Storage Configuration
- FreeBSD Filesystem Configuration
- FreeBSD Users and Groups
- FreeBSD Packages, Services, and Monitoring
Requirement :
- First, get the latest FreeBSD CD 1 ISO image released from the FreeBSD download page and burn it to a CD. Place the CD image into your system CD/DVD drive and reboot the system into BIOS/UEFI mode or boot menu sequence by pressing a special key (usually ESC, F2, F11, F12) during the power-on sequence.
- Instruct the BIOS/UEFI to use the CD/DVD appropriate drive to boot from and the first screen of the installation process should be displayed on your screen.
- Press the [Enter] key to start the installation process.
- On the next screen select the Install option and press [Enter]to continue.
- Select your keyboard layout from the list and press [Enter]to move forward with the installation process.
- Next, type a descriptive name for your machine hostname and press [Enter] to continue.
- On the next screen select what components you want to install in the system by pressing the [space] key. For a production server, it’s recommended you choose only lib32 compatibility libraries and Ports tree.
- Press [enter] key after you’ve made your selections to continue.
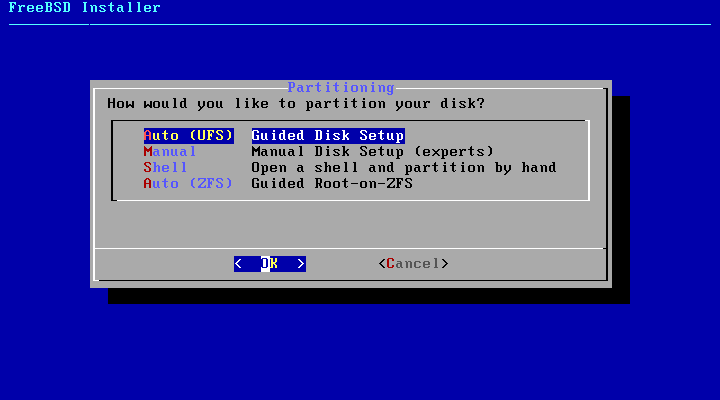
- Next, choose the method your hard disk will be partitioned. Select Auto – Unix File System–Guided Disk Setup and press the [enter]key to move to the next screen.
- On the next screen, select to perform FreeBSD OS installation on the entire disk and press the [enter] key again to continue.
- However, be aware that this option is destructive and will completely wipe out all your disk data. If the disk holds data, you should make a backup before continuing further.
- Next, select your hard disk partition layout.
- In the next screen review the automatically created partition table of your system and navigate to Finish using the key to accept the changes.
- Press [enter] to continue and on the new pop-up screen select Commit to start the effective installation process.
- After the installer extracts and writes the operating system data to your system drive, you will be prompted to specify the password for the root account.
- On the next step, select the network preferences you want to configure and press [enter] to set up the NIC.
- Choose to use the IPv4 protocol for your NIC and select to configure the network interface manually with a static IP address by negating the DHCP protocol.
- Next, add your static network IP configurations (IP address, netmask, and gateway) for this interface and press the [enter] key to continue.
- If the network equipment at your premises (switches, routers, servers, firewalls, etc) is IPv4 based then is no point in configuring IPv6 protocol for this NIC. Choose No from the IPv6 prompt to continue.
- The final network configuration for your system involves setting up the DNS resolver.
- Next, from the time zone selector choose the physical region where your system is located and click OK.
- Select your country from the list and accept the abbreviation for your time setting.
- Next, adjust the date and time set for your machine if that’s the case, or choose to Skip the setting in case your system time is correctly configured.
- On the next step select by hitting the [space] key the following daemons to run system-wide: SSH, NTP, and powerd.
- At the next screen, check the following options to increase your system security: Disable reading kernel message buffer for unprivileged users, Disable process debugging facilities for unprivileged users, Clean /tmp filesystem on startup, Disable Syslogd network socket and Sendmail service in case you’re not planning to run a mail server.
- Next, the installer will ask you whether you will like to add a new system user.
- Finally, a new screen will provide a list of options you can choose to modify your system configuration, select the Exit option to complet reinstallation add click on Reboot to restart the system.
- Remove the CD from the system drive and press [enter] at the first prompt to start the system.
Computer and laptop Hardware troubleshooting
Dismantling of laptop
Dismantling of the laptop is an important procedure in hardware repairing.
- When you are going to do dismantling, and then disconnect the battery first. Move the locking slider to the ‘unlock’ position it is the present backside of the laptop.in some cases, the arrow will be given at the top of the lock and move the slider in the direction of the arrow and pull the battery out straight and not on an angle.
- Use a proper screwdriver. While removing a cover, for example, a hard drive or RAM covers. Stick tape over the screw hole to keep the screws in place. So that you won’t lose the screws.
- If the threads are damaged. If unable to remove using drilling device.
- Remove the screws from all of the covers that house the components found on the underside of the laptop.
- The number of covers will differ from each one of the laptops.
- While removing CD/DVD drive you have noticed any screws present on the cover
- Screw size will be mentioned on the top of the cover
- Remove the covers and screws. Keep them in a separate place.
- While removing RAM, see the clips will present.it acts as a lock .so slightly move this clip and pull outward RAM. Otherwise use a plastic opening tool. When release the RAM will be placed at an angle of 30 degrees. Remove in this angle and replace in this angle.
- Then remove the Wireless card .it is looking likes a small gold-tipped cover. This is the wireless antennae. Remember to remove it at a 30-degree angle. It’s removed like RAM.
- Then you can see the heat sink under a cover then leave it in place. Remove carefully if its needs to be removed.
- Some of the screws present in the Hinge Cover Plate. These screws might be given inside the removed battery area.
- Once the hinge cover plate is removed, then, use your fingers to carefully remove the whole part.
- Check for any additional screws near the bottom of the keyboard too.
- The keyboard will not easily you have to push it forward toward the screen first.
- The ribbon cable present under the keyboard.The ribbon cable is present in a place by a plastic hinge .in which you can lift using your fingernail or a plastic tool.
- If u feel you might forget .you can take a picture of this. Take a picture or draw a diagram of the cable path.
- The ribbon cable connectors some varieties. so taking pictures is a good idea to remember the cable path.
- Remove the display unit before that you have to need to remove the antennae cable and the LCD data cable. These cables can be connected in straight forward. Remove it from straight forward.
- Take out the hinge screws for display removing. Take out the hinge screws for the display assembly and remove the part.
- Remove the black rubber pads around the edge of the screen surround. Remove it by finger. Using a spudger tool remove the front cover away from the back part of the screen.
- Remove the tiny screws from the side of the LCD screen and remove the screen taking care.
- Use the spudger plastic tools.to remove the Pry case apart
Next, we need to remove the Motherboard. While removing the motherboard ensureabout Removing all screws securing the system board, the power board, the video board, etc. Disconnect all cables, connecting the boards. - Sometimes the screws on the motherboard will be in white arrows. Take the screw from the motherboard and remove it.
Assembling process
- Initially fix the motherboard back into the case and reconnect the sound cable.
- Fix all screws back into the white arrow holes.
- Fix the case parts back together. Fix the cables including the antennae cable back through.
- Fix the retaining screws back into the bottom half of the laptop.
- Fix the top screws back in.
- fix the screen back in place and reconnect the antennae and the data cable.
- Fix the display hinge screws.
- Fix the keyboard.
- Don’t forget to connect the ribbon cable back in.
- .Fix the keyboard retaining screws.
- Fix the Hinge Cover Plate back into place…
- Fix the RAM. Fix it in slots at 30-degree angles and should not to fix straight.
- Once you are placed at a 30-degree angle, press it downwards into place.
- Fix the wireless card, at a 30-degree angle. Fix it in slots at 30-degree angles and should not to fix straight.Reconnect the gold connector.
- Fix the Hard Disk Drive by sliding it in the opposite direction to the arrow
- Connect the CD/DVD drive and fix the screws back into the underside of the laptop.
- Fix the r the component covers and replace all of the screws.
Dismantling of computer
- Switch off the desktop disconnect the power cord and disconnect any peripheral items attached to the desktops, such as the keyboard, mouse, monitor, headphones, and any external drives.
- Use ESD protection to touch the desktop. Such as wrist straps, gloves, the ground connection, and an apron.
- Disconnect the side covers; remove them from the front side of the desktop.
- Disconnect all the connectors, and then disconnect the card readers and internal DVD players. These are screwed into place.so remove screws first
- Remove cooling fans. Remove any dust; clean it with IPA solution, or by Swiffer.
- Disconnect the cables and Disconnect the storage drive. storage drives are present with multiple screws.
- RAM will be removed at a 30-degree angle. This will cause easy removal. Do not disturb the gold connectors on the chips.
- Remove the power supply unit by disconnecting the remaining connectors.
- Disconnect the adapter or expansion cards from the motherboard.
- Remove all the cables from the motherboard.
Computer overheating issues

When overheating is produced in the computer, it may lead to hanging, freezing, slow down the process. Check the outflow vents are blowing hot air and the intake vents are letting air in. if not much airflow comes, then the most common cause is an accumulation of dust in the vents, fans, and cooling channels. Sometimes it leads to severe problems. The motherboard would be short because of overheating.it entirely affects the system performance. While running a computer it produces lots of heat and also the laptop will produce heat. Lack of ventilation, excessive dust will block the air ventilation. While you found your system is overheating then do the below procedure
Solution
- First thing you should Shut down the computer
- Must Unplug all the cables
- Next, Remove the battery
- Use proper ESD
- Disassemble the computer properly .than clean the dust from the air ducts by using cloths or Swiffer.
- You can also use IPA solution to clean up air ventilation paths.
- Attach filters on the air inhalation ducts.
- Sometimes it might be a BIOS issue. so u can update BIOS.
- You need to watch one important thing, that your fan is running required speed at all the time. If the fan is failure that time also the cooling system will fail.
Overheating issues in laptops
Overheating of a laptop may lead to hanging, freezing, slow down the process. You can see multiple vents. Some are intake vents where cool air gets drawn into the laptop and some are outflow vents where fans expel the hot air. The motherboard would be short because of overheating.it entirely affects the system performance. While running, the laptop will be producing heat. Lack of ventilation, excessive dust will block the air ventilation, degenerating thermal paste, a clogged-up fan. While you found your system is overheating then do the below procedure

- First thing you should Shut down the computer
- Must Unplug all the cables
- Next, Remove the battery
- Use proper ESD
- Disassemble the laptop properly .than clean the dust from the air ducts by using cloths or Swiffer.Dust will form layers and dirt that slow them down and block airflow.. when your laptop is overheating is to clean the fan(s) that provide(s) cooling to the CPU and graphics card
- You can also use IPA solution to clean up air ventilation paths.
- Attach filters on the air inhalation ducts.
- Sometimes it might be a BIOS issue. so u can update BIOS.
- If you want to know the inner side temperature of the laptop you can use the tool called Monitor.
- Thermal paste is also one of the reasons to produce overheat from the CPU. Because the thermal paste is the heat conductive material.it connects the CPU or GPU with the metal heat sink; to solve this problem apply a fresh thermal compound.
- While you are open up the laptop, clean the fan carefully with a cotton swab dipped in a drop of IPA solution. Dry it by blower after cleaning.
- Use a vacuum cleaner to remove dust and dirt that clocks up the fan.
- Clean the exhaust port with a vacuum cleaner.
- External inhaling grills cover fans that take cooler air into the laptop. To clean the inhaling grills, spray them with canned air.
- Apply new thermal grease to the interface between the CPU and GPU and its heat sink.
- A laptop is placed in the wrong position or uneven position air ducts are at the bottom, placed in a blanket, pillow, or your lap, this will restrict the airflow. Due to this cooling is restricted, heat will build up, the internal temperature will increase, and whereas, the laptop will overheat.
- Keep the laptop flat surface.
- Use Laptop coolers are meant to provide additional cooling.
- Use apassive cooler that does not consume power and will absorb heat.
- Check for Dying Batteries. Battery problem is also one of the major reasons for overheating. If the battery is a problem, it will drain quickly after the full charge is done also.
- If you are running large apps and multiple functions that will also lead to overheating, so try to close multiple functions. Use CCleaner
Without Fan Laptop
For dissipating heat without laptops are uses passive cooling technology .such as, spreading the heat across the entire metal body or throttling CPU clock speeds to regulate heat. If the laptop doesn’t have a fan or finds intake grills or exhaust ports, your laptop would be working on passive cooling. But it has trouble, while it takes over the load
Battery issue on a laptop
- There are three types battery used in laptop
- CMOS Battery
- Bridge Battery
- Main Battery
The main battery can be further classified into four types.
- Nickel Cadmium
- Nickel Metal Hydride
- Lithium-Ion
- Lithium-Ion Polymer
Lithium-ion batteries can easily lose the ability to hold a charge. Replacing a battery is relatively simple. Remove it from the bottom or back of the laptop. If the laptop is plugged in on a fully charged battery, don’t run it will do more harm to your battery Check that all your cables and connectors are fixed perfectly. If it is not fixed, then completely drain your battery, until the laptop dies, so keep connection properly. Most people have the habit of always connect the charging cable to the laptop all the time or connecting the charge when the battery is very low. Don’t do these things to increase the longevity of your battery. When the laptop’s battery is level is below 20 percent, you need to put charge.
Solution
If the battery backup level is decreased on your laptop compared to when it’s starting position, it might be happened by bought the bad quality battery. Thus, may leads to draining faster and showing less performance. For this condition, we need to do the Battery replacement.
Procedure to keep the battery in good condition.
- Don’t do turn on your brightness to its maximum level. It is a possibility that loss of battery life.
- The laptops have two function keys. That is used to increase or decrease brightness easily. Otherwise, go into the Settings > System > Display.
- Use Microsoft browser saves some amount of battery level when compared to other browsers such as Firefox Browser, Opera, Google Chrome,
- Turn off keyboard backlights. When needed you can use it.
- You can simply switch it off by pressing a function button on your keyboard or turn it off from Windows Mobility Centre.
- Don’t use heavy software until if it needs.
- Laptops also have use battery saver mode. You can check if the battery saver is on by simply going into Settings > System > Battery.
- When the battery saver mode is off just activate it.
- Once the battery percentage reaches below 20 percent.it automatically goes to battery-saving mode. Always notice the email and calendar syncing, push notifications, and apps running in the background are disabled or not.
- Disconnect unnecessary devices. if you’re not using just disconnect the webcam, external hard drives. Must remove a mouse, when the laptop is in sleep mode as it consumes battery as well.
- If you are not using Bluetooth and Wi-Fi, if not have wirelessly connected Bluetooth or speaker. Also, you can switch off the Wi-Fi. if you don’t need the internet then disconnect. You can turn it on when in need of sending a mail, surf the internet, or something else.
Hard Drive failure
Symptoms
If a hard drive fails some symptoms will happen such as Excessive program load times, slow file transfers, if the computer works well, but some data is missing, the hard disk is not detected by the computer or a laptop. When the BIOS process is going the hard disk is not detected. There is malware damage to the program files, you cannot read, copy, delete or do any other actions with files that are on the hard disk. If defragment ofdata is taking along times means you can use the tool name called defragmenter. There are several issues are there to lead the hard drive to the worst conditions. Currently, we are using two types of hard drives. SSD-solid state drive and HDD hard drive. Both will do better performance. Sometime two will get failure.
Reason for failure
- Because of long time use also one of the reasons for hard drive failure .because every machine has an expiry date.
- If you are using the hard drive at a high temperature if the cooling system gets damage. Not proper cooling happened, it will also lead to hard drive failure due to over temperature.
- Sudden power off, power fluctuation or short circuit happening due to this hard drive may get damaged. Use a regulator to give a continuous power supply.
- If you’re not properly shut down the computer then it will lead to the hard drive failure. And also you lose your current working data., so always do a proper shutdown.
- Mishandling or rude use of a hard disk; or you fall drop your laptop on floor internal components of a hard disk are very fragile, especially in classic HDDs.
- Due to Water damage, the hard drive might be a failure. If you are room is too moisture, that may also damage the hard drive and the whole computer’s electronics.
- If you are keeping your system near to the high magnetic field. Any magnetic field is not good for a computer, but the stronger the field gets, the risk of disk failure.
Recover files from a hard disk
- The first you need to download and install Disk Internals Partition Recovery on your computer or laptop
- Automatically the recovery wizard will start while you install it. And it will ask you to select the partition on the hard disk that you want to recover, Then do full scanning mode.
- If the scanning process will start. Wait for a few minutes to complete.
- Next, do Preview and restore. Now you can view all the files found for free by right-clicking on the file and selecting “Preview in a new window”.
- To save the recovered files, it will ask for the license. You have to buy a license and enter the license key.
- Next, you have to select the place where you want to save found files. But don’t save them in the old place.
- Finally, all found data will be restored automatically.
Virus infection
If a laptop or computer is affected by virus infection .then the system will large pop-ups and the system process will slow down, sometimes freezing, hanging will happen. Use anti-virus to protect your system.
- Kaspersky Anti-Virus
- Trend Micro Antivirus+ Security
- Webroot Secure Anywhere Antivirus
- ESET NOD32 Antivirus
- G-Data Antivirus
- Itdefender Antivirus Plus. Well rounded everyday antivirus protection
- Norton Antivirus Plus. Smooth protection for your system
- F-Secure Antivirus SAFE. Easy to use antivirus protection.
The keyboard not working properly
Due to mishandling, waterlog, the keyboard buttons will be damaged. we need to replace the keyboard .sometimes it will happen by motherboard or keyboard strip and connector problem.
RAM failure
If RAM is a failure .it will be confirmed by some symptoms.
- The system process slows down.
- Restating, freezing, or hanging also the reason for RAM failure.
- One of the main symptoms is immediate reboot while opening the desktop. This could be a sign of faulty RAM.
- When RAM failure the blue screen with white text flashes happens before restarting.
- The installation of a new program repeatedly is a reason for RAM’s fail.
- Overvoltage or power fluctuations can damage most computer components, including RAM. Use overvoltage protector.
- Use ESD protective equipment such as wrist straps, apron, gloves. Electrostatic discharge can damage your computer.
- If your computer will produce multiple beeps or a continuous beep when you turn it on. This will indicate your RAM in a critical situation. A beep sound will produce not only for RAM failure and also for other issues.
- If u found RAM is a failure replace it.
Monitor problem
There are many types of monitor problem will come .such as, line on display, dim or dull display, black screen.
Lines on the Display
Multi-colored or single-colored vertical lines come on your laptop screen, it may be a result of a hardware failure or damage to the screen. Keep holding the power button for 30 seconds and restarting the laptop. Still, colored lines are there. Then the LCD screen might be broken. We need to replace the monitor .before that replace once we need to check this laptop with a good monitor.
Blank Display
while you turn On the laptop, you can the lights blinking and you can hear the fan sound and it’s working. but if the laptop screen is blank and doesn’t display anything, this might be a display or motherboard. Take back up of all the data to another drive. check motherboard .try it with another good monitor also.
Dimmed Display
Initially check the brightness level is set to maximum. Then the display is still dim, try restarting the device. This could just be a system error that can be resolved by restarting the device. Also, check if the AC adapter cord is properly connected. The inverter board converts the low voltage into higher voltage in the laptop.so If the inverter board or bulb fails, the dull display problem occurs. Broken display. If it’s broken you need to replace it.
Monitor problem on the computer
monitor problem on a computer may happen because of improper power cable connection or monitor problem. Try it with a good monitor. Otherwise, check the motherboard.
SMPS Troubleshooting
SMPS is a PSU (power supply unit) and is usually used in computers to change the voltage to the appropriate range for the computer. It Converts the AC power into DC power to the computer components. It Adjusts output voltage and current for different configurations. A laptop is inherently based on SMPS topology and it usually provides around 19volts dc to the laptop, many circuits inside the laptop that work on 1.8 volts /3.3 volts. The majority of Electronic DC Loads like Microprocessors, Microcontrollers, LEDs, Transistors, ICs, and Motors, etc. are supplied with standard power sources like batteries.
it is used to convert AC to DC, AC to AC, DC to DC, and DC to AC voltages. it consists of a transformer, rectifier, voltage regulator, and a filter. in which The input supply is turned.On and Off by MOSFETs. it produces a high-efficiency output voltage and regulated voltage.

it has a power cable connection port .here it s gets power. The input supply gets converted to DC supply. The power-OUT connector is used to give supply to monitors or any display unit.it consists of The FAN backside. blows the air out and is only used to dissipate the internal heat from the SMPS. it has a 24.-pin ATX connector .its used to supply DC supply to the motherboards. different color-coded wires connect to this connector and each colored wire supplies distinct DC voltage.
- red -5v
- yellow – +12v
- black -ground
- blue- – 12v
- grey – power good
- green- power ON
- purple- +5v stand by
- orange- +3.3v
- Brown/orange- +3.3 v sense
- white- -5v optional
it has a 4 pin ATX-12V connector. it supplies 12 volts to energize the central processing unit and other components of the motherboard.it has 6 pins AT Connectors. old model PCB used to support AT connectors also called P8 and P9 connectors to supply power to these motherboards. red is +5v, white is -5v, black is ground, blue is -12v, yellow is +12v, orange is +5v.for checking you need to short the green wire connector to any black colored is a ground connector. If the SMPS is working perfectly, the fan of the supply will start working.